


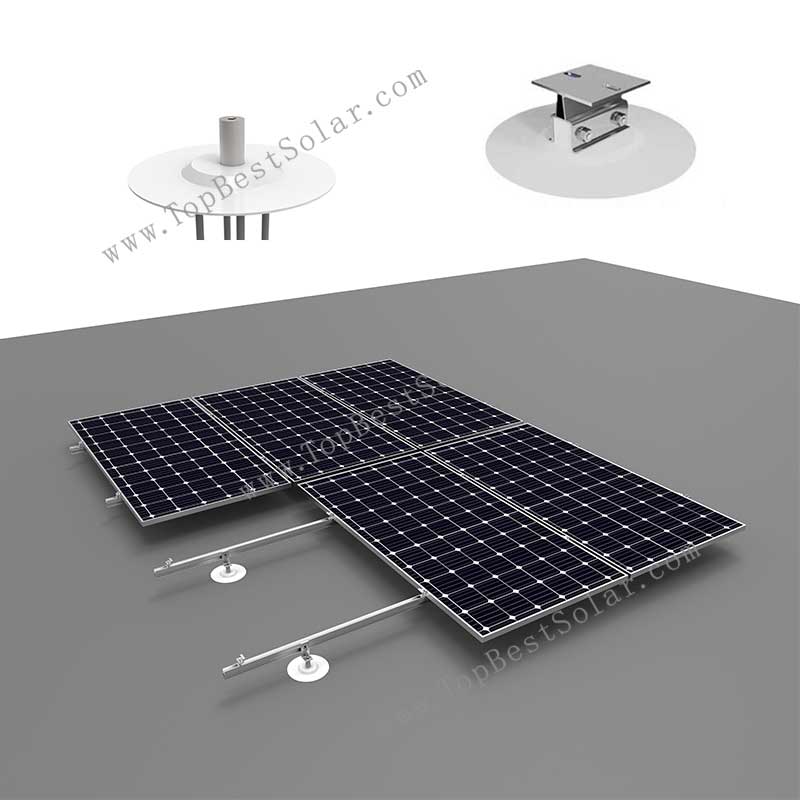

TPO PVC membrane roof solar mounting system
Model: SPC-RF-TPO-DR
Installation Site: Shingle Roofing
Material: SUS304, 6005-T5 Alum
Tilt Angle: 0° to 45°
PV Module: Framed, Frameless
PV Orientation: Portrait, Landscape
Wind Load: 60 m/s
Snow Load: 1.4 KN/M2

Product Description:
This TPO/PVC membrane roof solar mounting system is a complete kit that keeps a single-ply membrane roof waterproof. Each position starts with a weldable solar mount: self-tapping screws drive through the membrane and the insulation and anchor the base plate to the steel deck, and your crew then heat-welds a matching TPO or PVC disc over the whole fixing. So no fastener stays exposed and no sealant is needed, and the roof therefore keeps its warranty intact. You build the array roof-parallel at 0 degrees, and we ship everything as one bill of materials: weldable mounts, L-feet, rails, clamps and bonding hardware.
What the system includes
- Weldable solar mounts. A Ø200 mm TPO or PVC membrane disc matched to your roof covers a Ø100 mm aluminium-zinc coated base plate and carries a Ø25 mm × H45 mm 304 stainless steel post with an M8 threaded top; four self-tapping screws anchor each base.
- L-feet. Bolt into the M8 threaded post and carry the rail.
- Mounting rails. Standard profile that accepts mid and end clamps for framed modules.
- Clamps and bonding hardware. Mid clamps, end clamps and grounding clips.
Why EPC contractors choose this membrane roof solar mounting system
- Every fixing ends up sealed waterproof. The screws anchor into the steel deck, and your crew then welds a matching TPO or PVC disc over them, so the roof keeps its waterproofing even though the fixings pass through it.
- Screws hold it down, the weld keeps it dry. Pull-out strength comes from the mechanical fixing — more than 3000 N per base, tested on steel deck 0.8 mm or thicker. The weld only has to keep water out.
- Your crew welds each disc in minutes. They use the same hot-air welder they already run for membrane seams, so you add no ballast, no concrete blocks and no extra dead load.
- The 200 mm disc gives the weld room to work. It leaves a wide, continuous bead around the whole fixing, so your crew can inspect the seal bead by bead on the day it is made instead of trusting a small patch.
- The post accepts the racking you already stock. Its M8 threaded top takes a standard L-foot and mounting rail, so it drops straight into your existing inventory.
- You can strip it out for re-roofing. Just back the screws out and cut the disc free when you replace the membrane, which matters on 25-year roof warranties.
Typical applications
- Insulated commercial roofs: single-ply TPO or PVC membrane over a steel deck of 0.8 mm or thicker
- Lightweight steel-structure factory roofs and warehouses where ballast weight is not permitted
- Retrofit projects where the existing roof warranty must remain valid
- Roof-parallel (0-degree) arrays and east-west layouts
Keeping the roof waterproof when you mount solar panels on TPO roofing
If you are mounting solar panels on TPO roofing, the fixing method decides whether the roof stays watertight. A penetrating mount drives fasteners straight through the waterproofing layer and leaves them exposed, and a ballasted array loads the structure instead. A welded base anchors to the deck first, and then your crew seals every fixing under a TPO/PVC disc welded to the membrane. This system takes that third route: the array sits roof-parallel, screws hold every kilowatt, and the weld keeps the roof waterproof.
Welded TPO/PVC membrane roof solar mounting versus ballasted and penetrating systems
On a single-ply roof there are only three ways to fix an array, and each one differs in roof load, leak risk and install speed:
- Fixings through the waterproofing — welded: 4 per base, every one sealed under a welded disc / ballasted: none / penetrating: 8–12 per kW, each one needing sealant and flashing
- Added dead load — welded: under 1 psf / ballasted: 15–25 psf (30–60 kg/m²) / penetrating: under 1 psf
- How it stays watertight — welded: heat-welded disc over every fixing / ballasted: membrane untouched / penetrating: relies on sealant and flashing
- Leak risk — welded: no leak path / ballasted: none / penetrating: moderate to high
- Install rate — welded: 100–150 kW per day / ballasted: 40–70 kW per day / penetrating: 60–90 kW per day
- Roof warranty — welded: can be preserved / ballasted: may be voided / penetrating: voided
- Structural capacity needed — welded: low / ballasted: high / penetrating: low
Specifiers do reach for a ballasted array first on concrete-deck commercial roofs. However, that route adds 30 to 60 kg of dead load per square metre, and large-span steel-structure factory roofs rarely carry that reserve. For this reason a welded TPO/PVC membrane roof solar mounting system usually wins the job there.
Installing the TPO/PVC Membrane Roof Solar Mounting System
- Clean the membrane surface where each base will sit.
- Mark out the base positions according to the array layout drawing.
- Drive the self-tapping screws through the membrane and the insulation into the steel deck and fasten the base plate.
- Heat-weld the TPO/PVC disc over the fixing; a continuous bead around the disc confirms a complete weld.
- Bolt the L-foot and mounting rail onto the M8 threaded post.
- Clamp the modules and finish bonding and grounding.
Note on EPDM roofs
Nobody heat-welds EPDM membranes. For EPDM and bitumen roofs we supply an adhesive-fixed base instead. Tell us your membrane type with the enquiry and we will match the right fixing method.
Ordering information
Each weldable base weighs 0.47 kg in the TPO version. We keep screws in stock from 80 mm to 125 mm, and we make longer lengths for deeper insulation. We supply EPC contractors and distributors factory-direct as a complete kit, we offer OEM branding and palletised packing, and we quote against your roof build-up. Send us your membrane type, insulation thickness, deck thickness, wind load requirement and array layout, and we will return a quotation together with a pull-out test report.
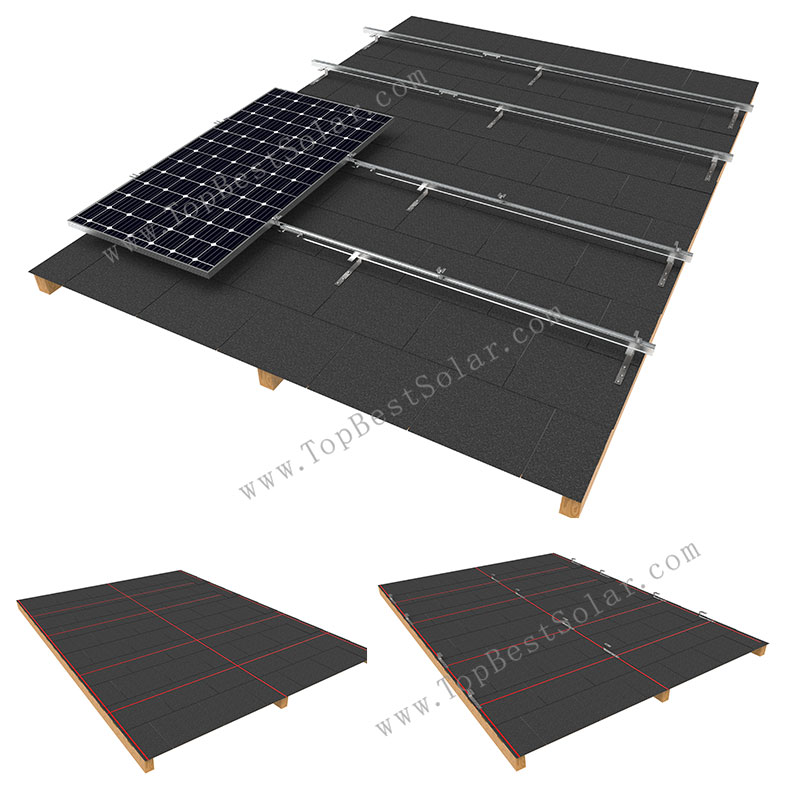
Installation instructions for solar panel shingle roofing mounts with bracket SPC-RF-IK13-DR:
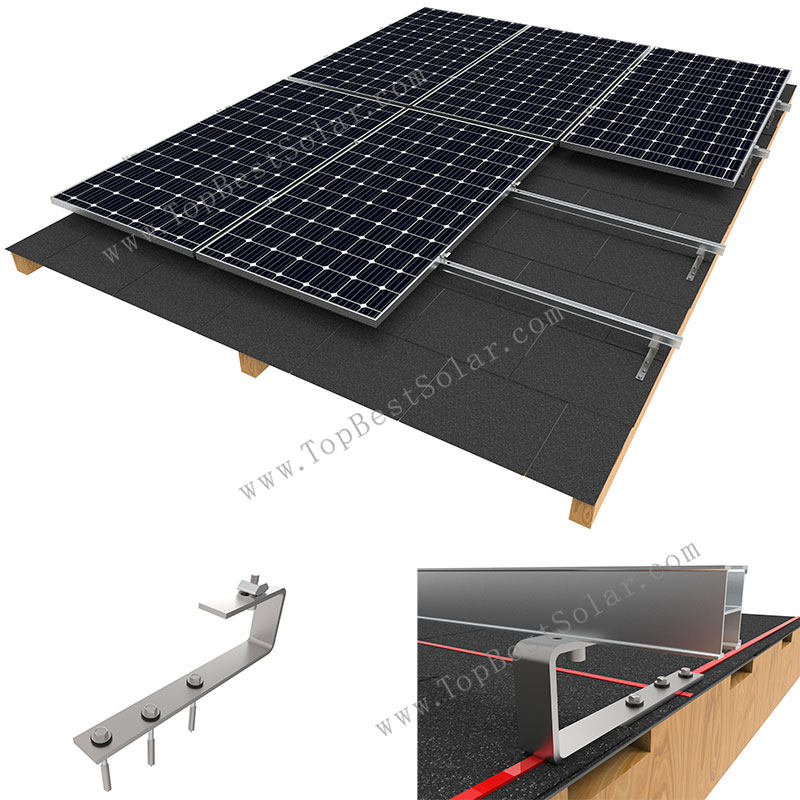
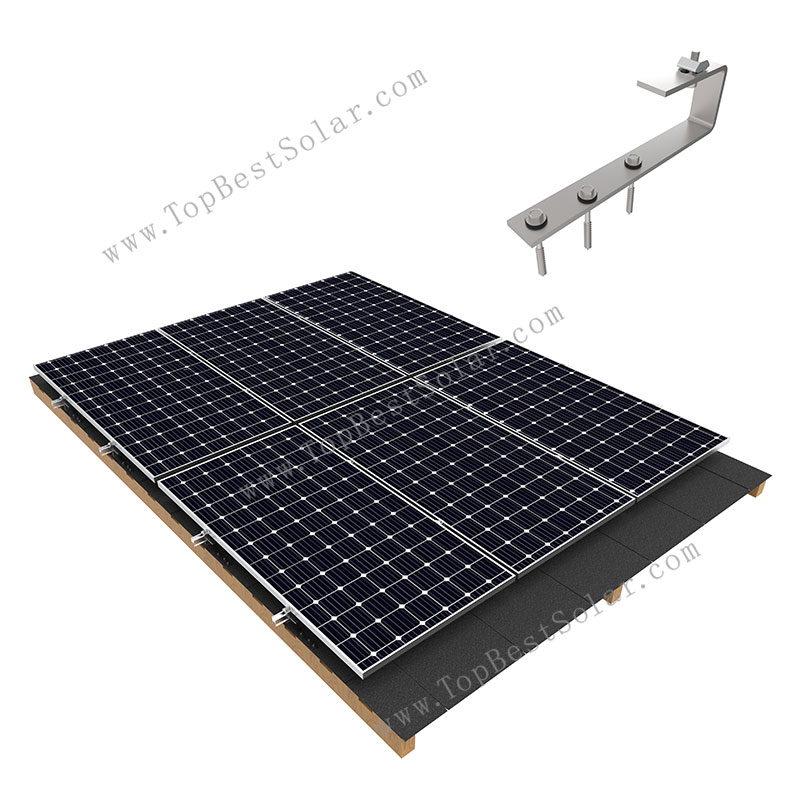
The roof hook for shingle rooftop is made of stainless steel, corrosion-resistant and beautiful in appearance. The H-shape rail is made of aluminum alloy, and the surface is anodized, which is not easy to corrode and is light in weight. The overall mounting components are few, and the installation is simple and convenient. The Small Components are pre-assembled in the factory, which saves assembly time and labor costs on site. Before installing the system, please read the following installation instructions carefully.
Stainless steel hook installation steps:
1.1 Clean the asphalt shingle roof, and according to the site construction drawings, draw a line at the installation position of the main beam hook of the asphalt shingle, as picture 1 shows.
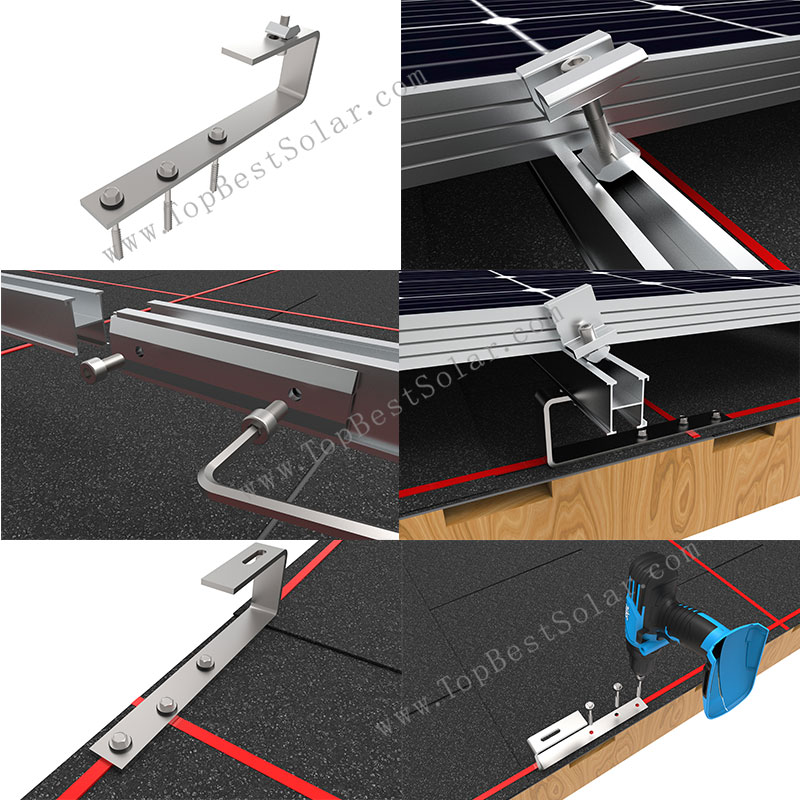
1.2 Put the stainless steel hook #13 on the installation position of the main beam, and fix the hook with three wood screws (ST6.3 * 80), as picture 2 shows. After installation ,as picture 3 shows.
1.3 According to step 2, fix all the remaining stainless steel hooks on the main beam according to the drawings. After installation, as picture 4 shows.
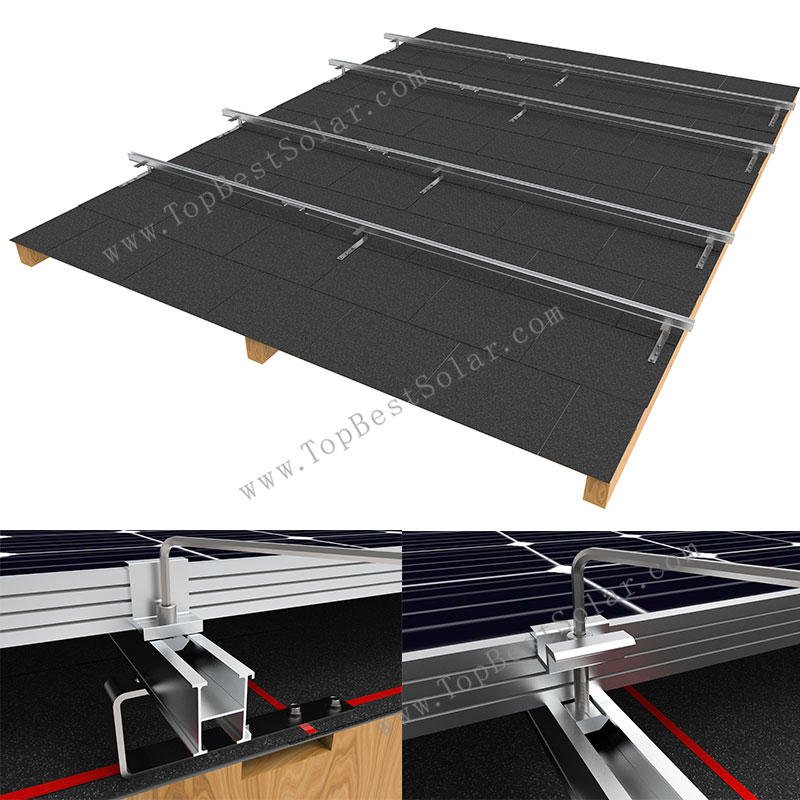
1.4 Use M8*25 clamp and bolts to install the H-rail on the stainless steel hook #13. As picture 5 shows.
1.5 Effect after installation.
1.6 Use the rail splice for the connection between the rail and the rail, Insert the connector into the groove behind the rail, insert 75mm on each side, and then lock the bolts, as picture
1.7 According to the above steps, connect the rails with rail splice first, and then install the rails on the hooks according to the construction drawings. After all the rails are installed, as
1.8 Put the panel vertically on the two rails, the installation sequence can be from left to right, from bottom to top, first press the solar panel by hand to prevent the panel from sliding
1.9 Use the end clamp to lock the side of panel, screw the clamp block on the mid clamp to the bottom of the bolt, and then put it sideways into the groove of the rail, as shown in
2.0 The installation of the mid clamp is the same as that of the end clamp. First, screw the sliding nut on the mid clamp to the bottom of the bolt, and then put it sideways into the groove of the rail. After install the mid clamp.
2.1 According to the above steps, use the mid clamp to install the panels from left to right.
2.2 After the overall installation.
membrane, fixing and warranty
Will mounting solar panels make my roof leak?
No. Your crew welds a matching TPO or PVC disc over every fixing, so no fastener stays exposed to the weather. Because that seal is a weld and not a bead of sealant, it cannot dry out, and nobody has to re-apply it in year five.
Does this system require drilling into the roof?
Yes — the self-tapping screws pass through the membrane and the insulation into the steel deck, four per base. Your crew then welds a TPO/PVC disc over every fixing, so nothing stays exposed and the roof stays watertight.
What pull-out strength can a welded base achieve?
More than 3000 N per base, tested on steel deck 0.8 mm or thicker. Ask us for the test reports and we will send them over.
What roof build-up does it fit?
Insulated single-ply roofs with a steel deck of 0.8 mm or above. Standard screw lengths run from 80 mm to 125 mm, and we make longer screws to order for thicker insulation. So tell us your insulation and deck thickness, and we will confirm the fixing before you order.
ordering and compatibility
How is this different from a ballasted flat roof system?
A ballasted array adds 30–60 kg/m² of dead load and needs a roof with spare structural capacity. This welded system adds less than 1 psf, which makes it the practical choice on large-span steel-structure roofs and warehouses where nobody permits ballast.
Does it work on EPDM?
No — nobody heat-welds EPDM. We supply an adhesive base version for EPDM roofs instead.
Is it suitable for high-wind coastal projects?
Yes. Give us your design wind speed and we will size the base spacing, then confirm the uplift resistance by calculation.
- Description
-
Product Description:
This TPO/PVC membrane roof solar mounting system is a complete kit that keeps a single-ply membrane roof waterproof. Each position starts with a weldable solar mount: self-tapping screws drive through the membrane and the insulation and anchor the base plate to the steel deck, and your crew then heat-welds a matching TPO or PVC disc over the whole fixing. So no fastener stays exposed and no sealant is needed, and the roof therefore keeps its warranty intact. You build the array roof-parallel at 0 degrees, and we ship everything as one bill of materials: weldable mounts, L-feet, rails, clamps and bonding hardware.
What the system includes
- Weldable solar mounts. A Ø200 mm TPO or PVC membrane disc matched to your roof covers a Ø100 mm aluminium-zinc coated base plate and carries a Ø25 mm × H45 mm 304 stainless steel post with an M8 threaded top; four self-tapping screws anchor each base.
- L-feet. Bolt into the M8 threaded post and carry the rail.
- Mounting rails. Standard profile that accepts mid and end clamps for framed modules.
- Clamps and bonding hardware. Mid clamps, end clamps and grounding clips.
Why EPC contractors choose this membrane roof solar mounting system
- Every fixing ends up sealed waterproof. The screws anchor into the steel deck, and your crew then welds a matching TPO or PVC disc over them, so the roof keeps its waterproofing even though the fixings pass through it.
- Screws hold it down, the weld keeps it dry. Pull-out strength comes from the mechanical fixing — more than 3000 N per base, tested on steel deck 0.8 mm or thicker. The weld only has to keep water out.
- Your crew welds each disc in minutes. They use the same hot-air welder they already run for membrane seams, so you add no ballast, no concrete blocks and no extra dead load.
- The 200 mm disc gives the weld room to work. It leaves a wide, continuous bead around the whole fixing, so your crew can inspect the seal bead by bead on the day it is made instead of trusting a small patch.
- The post accepts the racking you already stock. Its M8 threaded top takes a standard L-foot and mounting rail, so it drops straight into your existing inventory.
- You can strip it out for re-roofing. Just back the screws out and cut the disc free when you replace the membrane, which matters on 25-year roof warranties.
Typical applications
- Insulated commercial roofs: single-ply TPO or PVC membrane over a steel deck of 0.8 mm or thicker
- Lightweight steel-structure factory roofs and warehouses where ballast weight is not permitted
- Retrofit projects where the existing roof warranty must remain valid
- Roof-parallel (0-degree) arrays and east-west layouts
Keeping the roof waterproof when you mount solar panels on TPO roofing
If you are mounting solar panels on TPO roofing, the fixing method decides whether the roof stays watertight. A penetrating mount drives fasteners straight through the waterproofing layer and leaves them exposed, and a ballasted array loads the structure instead. A welded base anchors to the deck first, and then your crew seals every fixing under a TPO/PVC disc welded to the membrane. This system takes that third route: the array sits roof-parallel, screws hold every kilowatt, and the weld keeps the roof waterproof.
Welded TPO/PVC membrane roof solar mounting versus ballasted and penetrating systems
On a single-ply roof there are only three ways to fix an array, and each one differs in roof load, leak risk and install speed:
- Fixings through the waterproofing — welded: 4 per base, every one sealed under a welded disc / ballasted: none / penetrating: 8–12 per kW, each one needing sealant and flashing
- Added dead load — welded: under 1 psf / ballasted: 15–25 psf (30–60 kg/m²) / penetrating: under 1 psf
- How it stays watertight — welded: heat-welded disc over every fixing / ballasted: membrane untouched / penetrating: relies on sealant and flashing
- Leak risk — welded: no leak path / ballasted: none / penetrating: moderate to high
- Install rate — welded: 100–150 kW per day / ballasted: 40–70 kW per day / penetrating: 60–90 kW per day
- Roof warranty — welded: can be preserved / ballasted: may be voided / penetrating: voided
- Structural capacity needed — welded: low / ballasted: high / penetrating: low
Specifiers do reach for a ballasted array first on concrete-deck commercial roofs. However, that route adds 30 to 60 kg of dead load per square metre, and large-span steel-structure factory roofs rarely carry that reserve. For this reason a welded TPO/PVC membrane roof solar mounting system usually wins the job there.
Installing the TPO/PVC Membrane Roof Solar Mounting System
- Clean the membrane surface where each base will sit.
- Mark out the base positions according to the array layout drawing.
- Drive the self-tapping screws through the membrane and the insulation into the steel deck and fasten the base plate.
- Heat-weld the TPO/PVC disc over the fixing; a continuous bead around the disc confirms a complete weld.
- Bolt the L-foot and mounting rail onto the M8 threaded post.
- Clamp the modules and finish bonding and grounding.
Note on EPDM roofs
Nobody heat-welds EPDM membranes. For EPDM and bitumen roofs we supply an adhesive-fixed base instead. Tell us your membrane type with the enquiry and we will match the right fixing method.
Ordering information
Each weldable base weighs 0.47 kg in the TPO version. We keep screws in stock from 80 mm to 125 mm, and we make longer lengths for deeper insulation. We supply EPC contractors and distributors factory-direct as a complete kit, we offer OEM branding and palletised packing, and we quote against your roof build-up. Send us your membrane type, insulation thickness, deck thickness, wind load requirement and array layout, and we will return a quotation together with a pull-out test report.
- Installation
-
Installation instructions for solar panel shingle roofing mounts with bracket SPC-RF-IK13-DR:
The roof hook for shingle rooftop is made of stainless steel, corrosion-resistant and beautiful in appearance. The H-shape rail is made of aluminum alloy, and the surface is anodized, which is not easy to corrode and is light in weight. The overall mounting components are few, and the installation is simple and convenient. The Small Components are pre-assembled in the factory, which saves assembly time and labor costs on site. Before installing the system, please read the following installation instructions carefully.
Stainless steel hook installation steps:
1.1 Clean the asphalt shingle roof, and according to the site construction drawings, draw a line at the installation position of the main beam hook of the asphalt shingle, as picture 1 shows.
1.2 Put the stainless steel hook #13 on the installation position of the main beam, and fix the hook with three wood screws (ST6.3 * 80), as picture 2 shows. After installation ,as picture 3 shows.
1.3 According to step 2, fix all the remaining stainless steel hooks on the main beam according to the drawings. After installation, as picture 4 shows.
1.4 Use M8*25 clamp and bolts to install the H-rail on the stainless steel hook #13. As picture 5 shows.
1.5 Effect after installation.
1.6 Use the rail splice for the connection between the rail and the rail, Insert the connector into the groove behind the rail, insert 75mm on each side, and then lock the bolts, as picture
1.7 According to the above steps, connect the rails with rail splice first, and then install the rails on the hooks according to the construction drawings. After all the rails are installed, as
1.8 Put the panel vertically on the two rails, the installation sequence can be from left to right, from bottom to top, first press the solar panel by hand to prevent the panel from sliding
1.9 Use the end clamp to lock the side of panel, screw the clamp block on the mid clamp to the bottom of the bolt, and then put it sideways into the groove of the rail, as shown in
2.0 The installation of the mid clamp is the same as that of the end clamp. First, screw the sliding nut on the mid clamp to the bottom of the bolt, and then put it sideways into the groove of the rail. After install the mid clamp.
2.1 According to the above steps, use the mid clamp to install the panels from left to right.
2.2 After the overall installation.
- Leave Message
-
- FAQ
-
membrane, fixing and warranty
Will mounting solar panels make my roof leak?
No. Your crew welds a matching TPO or PVC disc over every fixing, so no fastener stays exposed to the weather. Because that seal is a weld and not a bead of sealant, it cannot dry out, and nobody has to re-apply it in year five.
Does this system require drilling into the roof?
Yes — the self-tapping screws pass through the membrane and the insulation into the steel deck, four per base. Your crew then welds a TPO/PVC disc over every fixing, so nothing stays exposed and the roof stays watertight.
What pull-out strength can a welded base achieve?
More than 3000 N per base, tested on steel deck 0.8 mm or thicker. Ask us for the test reports and we will send them over.
What roof build-up does it fit?
Insulated single-ply roofs with a steel deck of 0.8 mm or above. Standard screw lengths run from 80 mm to 125 mm, and we make longer screws to order for thicker insulation. So tell us your insulation and deck thickness, and we will confirm the fixing before you order.
ordering and compatibility
How is this different from a ballasted flat roof system?
A ballasted array adds 30–60 kg/m² of dead load and needs a roof with spare structural capacity. This welded system adds less than 1 psf, which makes it the practical choice on large-span steel-structure roofs and warehouses where nobody permits ballast.
Does it work on EPDM?
No — nobody heat-welds EPDM. We supply an adhesive base version for EPDM roofs instead.
Is it suitable for high-wind coastal projects?
Yes. Give us your design wind speed and we will size the base spacing, then confirm the uplift resistance by calculation.