

For homeowners with tile roofs, the dream of solar energy often comes with a nagging fear: will drilling holes in my roof cause leaks? This concern is valid, as a standard tile roof is a complex system designed to shed water through overlapping layers. Penetrating this envelope with traditional mounting methods can compromise its integrity. However, modern engineering has delivered a solution that not only eliminates this risk but can enhance the roof’s durability. This guide breaks down the critical steps to a safe and secure tile roof solar installation.
1. The Waterproofing Paradox: Why Traditional Mounting Fails
The primary challenge with tile roofs is their fragility and reliance on gravity for waterproofing. Standard mounting practices often involve removing tiles, drilling into the underlying roof deck, and installing flashing and sealants. This process creates multiple failure points.
-
Sealant Degradation: Over time, UV exposure and thermal cycling cause sealants to crack and harden, losing their waterproofing ability.
-
Tile Damage: Concrete and clay tiles are brittle. Walking on them during installation or removing them for bracket access often leads to breakage, creating entry points for water.
-
Compromised Drainage: Improperly installed brackets can disrupt the natural flow of water down the roof slope, leading to pooling and potential leaks.
The solution lies in a system designed specifically for the physics of a tile roof, not a generic adapter.
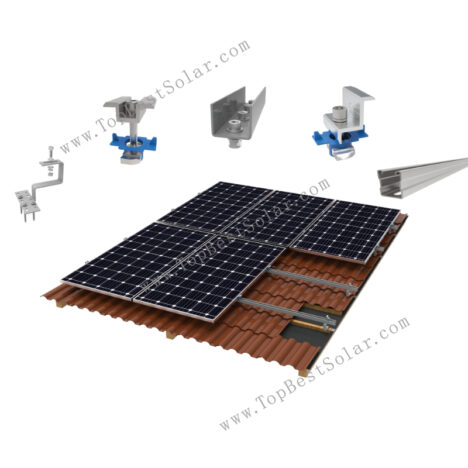
2. The Engineering Solution: A Non-Invasive, High-Clearance Design
A purpose-built tile roof mounting system, such as one utilizing hot-dip galvanized (HDG) hooks and U-rails, addresses these issues at a fundamental level.
-
Hook-and-Rail Mechanics: Instead of drilling through the tiles, specialized hooks are designed to grip the roof’s batten or structure underneaththe tiles. The tiles are carefully lifted, the hook is secured, and the tile is replaced. This preserves the roof’s continuous waterproofing layer.
-
Hot-Dip Galvanized (HDG) Defense: Tile roofs are exposed to constant moisture and temperature swings. HDG steel, with its thick, bonded zinc coating, provides superior resistance to corrosion compared to standard pre-galvanized or painted metals. This ensures the mounting hardware will last as long as the roof itself.
-
Maintained Ventilation: A well-designed system raises the solar panels several inches above the tile surface. This air gap serves a critical function: it allows heat to dissipate (improving panel efficiency) and prevents debris from accumulating, which can trap moisture against the tiles.
3. Structural Integrity: Supporting the Load Without Strain
A common misconception is that solar panels are “light.” A full array can add significant dead and live loads to a roof structure. Ensuring safety requires more than just strong brackets.
-
Wind Uplift Resistance: Tile roofs, especially in coastal or high-wind regions, are susceptible to uplift forces. A robust mounting system must be rated for high wind speeds (e.g., 60 m/s). This is achieved through triangulated supports and rigid rail splicing that distributes the load evenly across multiple roof rafters, not just at the penetration points.
-
Snow Load Capacity: For colder climates, the system must handle snow accumulation without deflecting. Look for a snow load rating (e.g., 1.4 kN/m²) that matches local building codes.
-
Pre-Assembled Precision: Components like rail connectors, mid-clamps, and end-clamps should arrive pre-configured. This reduces on-site assembly errors, ensures consistent torque on all fasteners, and speeds up installation, minimizing the time the roof is exposed to the elements.
4. The Installation Workflow: A Step-by-Step Guide to Safety
A safe installation is a methodical one. Rushing the process is the leading cause of future problems.
-
Structural Assessment: Before any work begins, a qualified engineer or installer must assess the roof’s condition and load-bearing capacity. Rotten or weakened rafters must be reinforced.
-
Tile Handling: Tiles are carefully removed and stored safely. Hooks are attached directly to the structural battens using corrosion-resistant fasteners.
-
Rail Alignment: U-rails are snapped into the hooks and aligned to ensure a perfectly flat plane for the panels. This step is critical for both aesthetics and wind resistance.
-
Panel Mounting: Panels are secured with clamps. The entire system is then torqued to specification to prevent loosening from wind vibration.
5. The Long-Term Value: More Than Just Energy Savings
Choosing a system engineered for tile roofs is an investment in the building’s long-term health.
-
Preserved Roof Warranty: By avoiding invasive drilling and using non-corrosive materials, you mitigate the risk of voiding the manufacturer’s warranty on your roofing system.
-
Asset Protection: The solar array acts as a physical shield, protecting the underlying tiles from hail, UV degradation, and extreme weather, potentially extending the roof’s lifespan.
-
Predictable ROI: With a design life that matches the PV modules (25+ years), you eliminate the need for costly mid-life roof repairs or mounting system replacements.
For the homeowner, the right tile roof solar mount transforms a potential liability into a resilient, revenue-generating asset. It proves that with the correct engineering, you can harness the sun without sacrificing the sanctity of your shelter.