


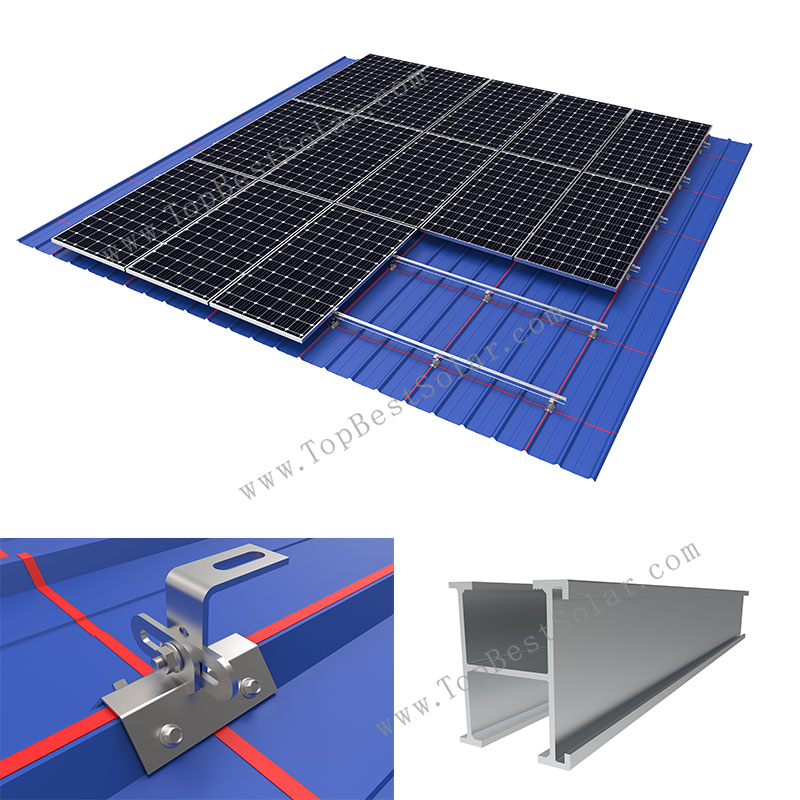
Solar Panel Metal Roofing Racks
Model: SPC-RF-CK02-HR
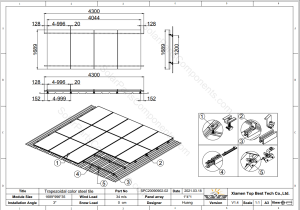
Installation Site: Trapezoid Metal Rooftop
Material: Aluminum alloy, Stainless steel;
Tilt Angle: 0° to 45°
PV Module: Framed, Frameless
Module Layout: As Designed
PV Orientation: Portrait, Landscape
Wind Load: 60 m/s
Snow Load: 2.0 KN/M2
Warranty: 10 Years

Product Description:
Solar Metal Roof Racking with our universal brackets is engineered for trapezoidal metal rooftop.
The adjustable bracket can fit for different size of roof ridges, which can get max flexibility for roof solar mounts.
Simple and pre-assembly installation kits help all mounting task quick and lable effecitive.
Anodized aluminum for rails and stainless steel for brackets, keep whole structure durable for more than 20 years life span.
Professional manufactuer for pv metal roof racking in 8 years up, competitive prices and experienced services can help yours any metal roof mounts a success.
Just offer basic mounting project information, we can begin design and quote in 3 days like below:
Solar panel dimension / pv module numbers / array planning / wind speed / snow load for local weather …
Besides this solar racks can be improved to shot-rail system which can be easy to ship and transport.
Advantages of this solar metal roof racking mounts:
1) Suitable for both framed / frameless PV modules;
2) No welding, no cut-on-site, easy for installing;
3) Anti-corrosive, High strength performance;
4) Robust designed for extreme climates;
Welcome to contact www.TopBestSolar.com for installing solar panel on your metal roofing arrays.
Whatever big or small, commercial or residential, TBS solar can offer mounting solutions for diverse roof types.
- Description
-
Product Description:
Solar Metal Roof Racking with our universal brackets is engineered for trapezoidal metal rooftop.
The adjustable bracket can fit for different size of roof ridges, which can get max flexibility for roof solar mounts.
Simple and pre-assembly installation kits help all mounting task quick and lable effecitive.
Anodized aluminum for rails and stainless steel for brackets, keep whole structure durable for more than 20 years life span.
Professional manufactuer for pv metal roof racking in 8 years up, competitive prices and experienced services can help yours any metal roof mounts a success.
Just offer basic mounting project information, we can begin design and quote in 3 days like below:
Solar panel dimension / pv module numbers / array planning / wind speed / snow load for local weather …
Besides this solar racks can be improved to shot-rail system which can be easy to ship and transport.
Advantages of this solar metal roof racking mounts:
1) Suitable for both framed / frameless PV modules;
2) No welding, no cut-on-site, easy for installing;
3) Anti-corrosive, High strength performance;
4) Robust designed for extreme climates;
Welcome to contact www.TopBestSolar.com for installing solar panel on your metal roofing arrays.
Whatever big or small, commercial or residential, TBS solar can offer mounting solutions for diverse roof types.
Components List of solar metal roof racks, SPC-RF-CK02-HR:
– High quality extruded aluminum alloy rail;
– mid / end clamps;
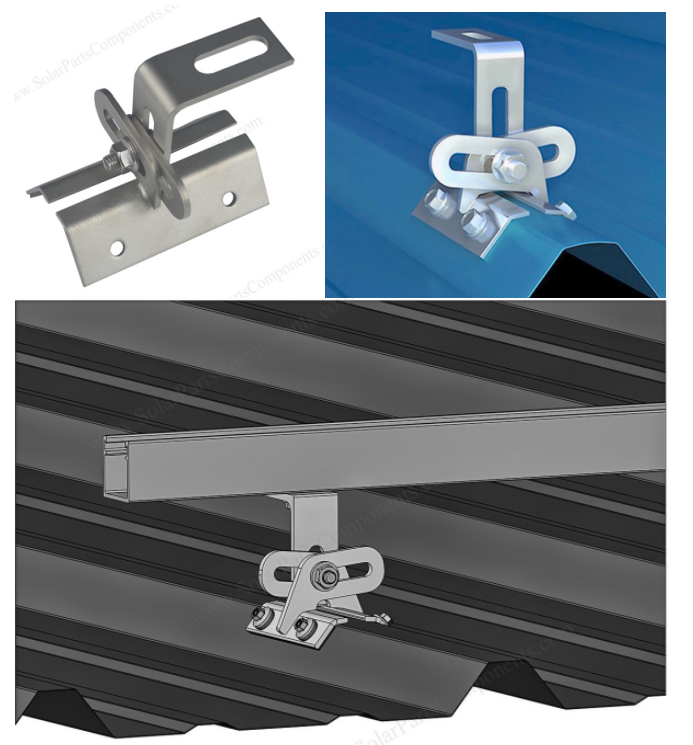
– stainless steel bracket (Model SPC-CK-02);
– self tapping screws;
- Components
-
Components List of solar metal roof racks, SPC-RF-CK02-HR:
– High quality extruded aluminum alloy rail;
– mid / end clamps;
– stainless steel bracket (Model SPC-CK-02);
– self tapping screws;
Solar Metal Roof Racking System SPC-RF-CK02-HR
Stainless steel multifunctional roof clamp installation steps
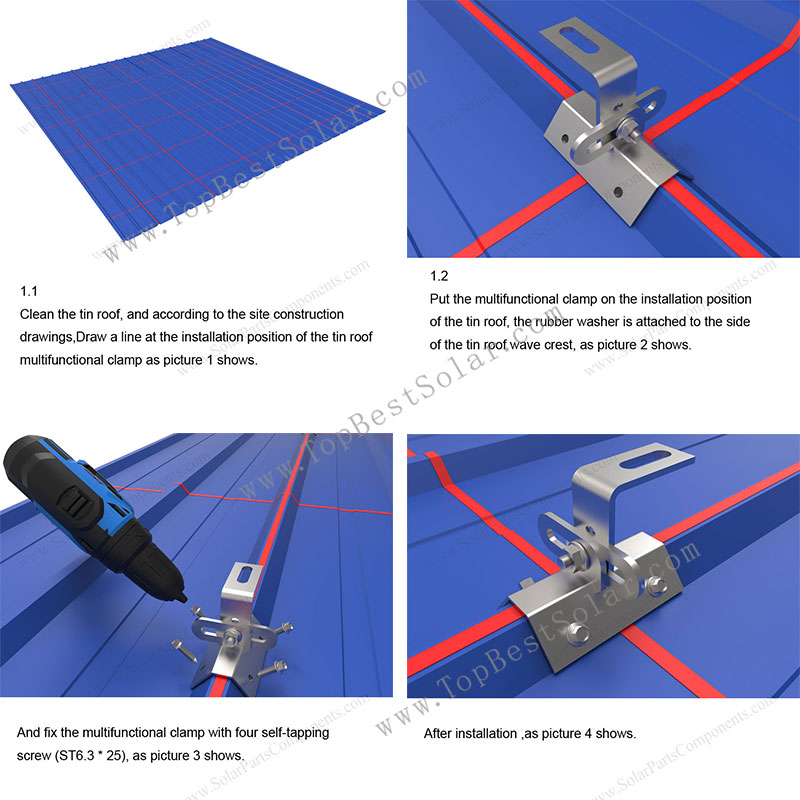
1.1 Clean the tin roof, and according to the site construction drawings,
Draw a line at the installation position of the tin roof multifunctional clamp as picture 1 shows.
1.2 Put the multifunctional clamp on the installation position of the tin roof, the rubber washer is attached to the side of the tin roof wave crest, as picture 2 shows. And fix the multifunctional clamp with four self-tapping screw (ST6.3 * 25), as picture 3 shows.
After installation ,as picture 4 shows.
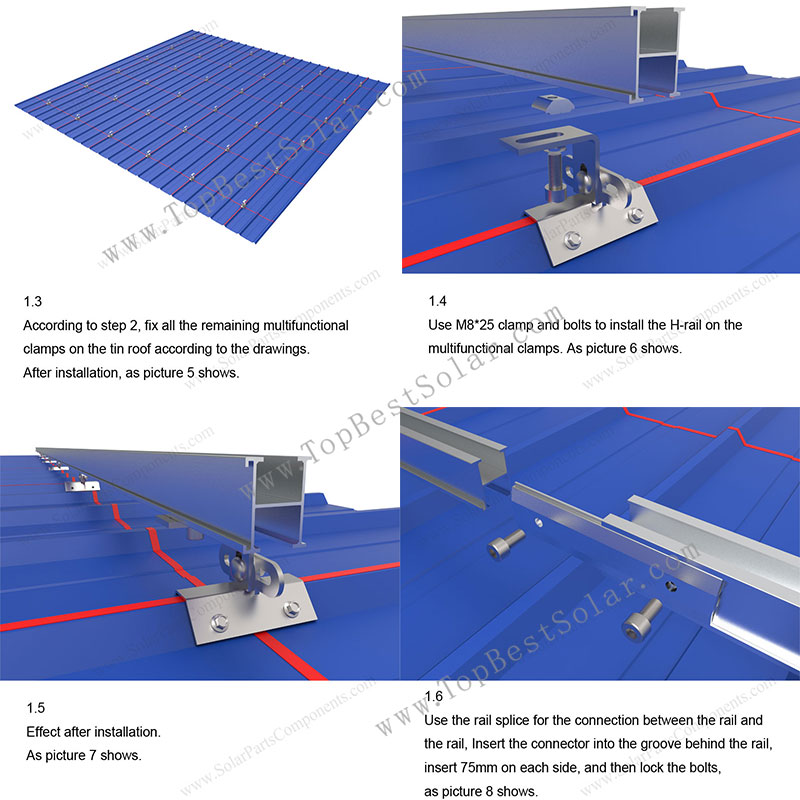
1.3 According to step 2, fix all the remaining multifunctional clamps on the tin roof according to the drawings. After installation, as picture 5 shows.
1.4 Use M8*25 clamp and bolts to install the H-rail on the multifunctional clamps. As picture 6 shows.
1.5 Effect after installation.
As picture 7 shows.
1.6 Use the rail splice for the connection between the rail and the rail, Insert the connector into the groove behind the rail, insert 75mm on each side, and then lock the bolts, as picture 8 shows.
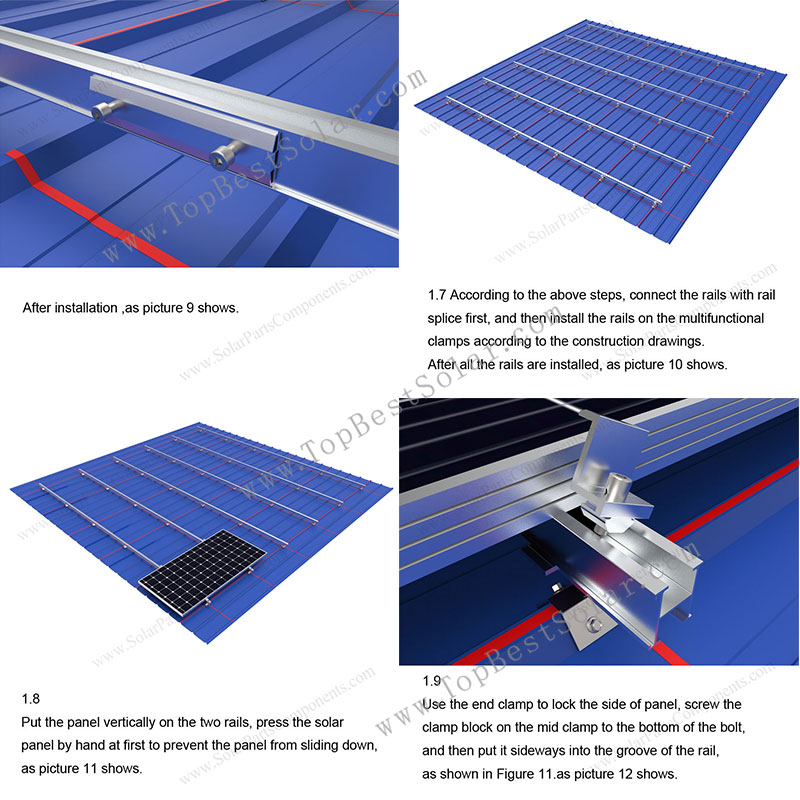
After installation ,as picture 9 shows.
1.7 According to the above steps, connect the rails with rail splice first, and then install the rails on the multifunctional clamps according to the construction drawings. After all the rails are installed, as picture 10 shows.
1.8 Put the panel vertically on the two rails, press the solar panel by hand at first to prevent the panel from sliding down, as picture 11 shows.
1.9 Use the end clamp to lock the side of panel, screw the clamp block on the mid clamp to the bottom of the bolt, and then put it sideways into the groove of the rail, as shown in Figure 11.as picture 12 shows.
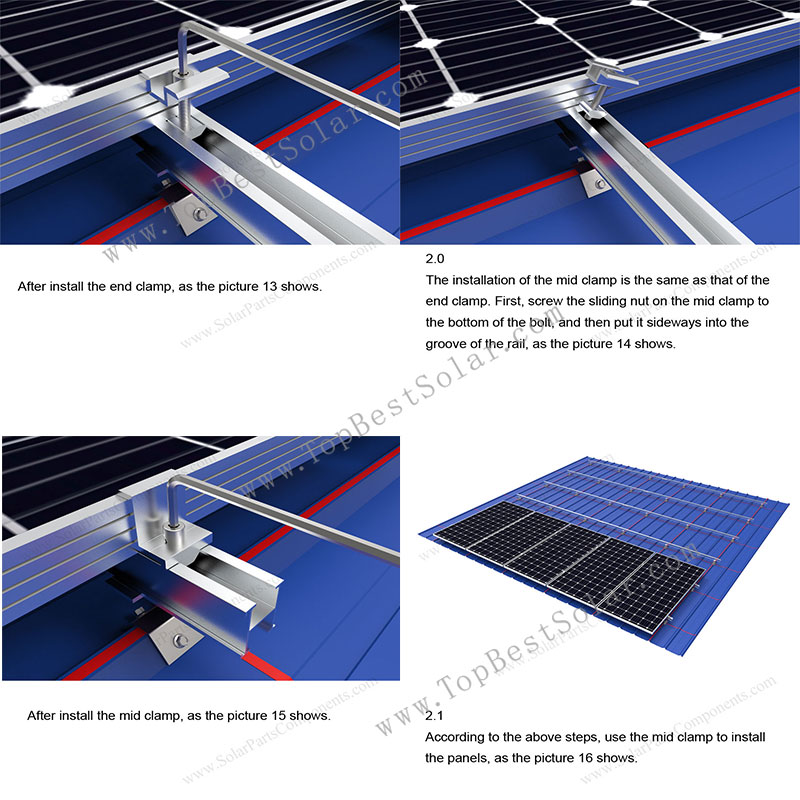
After install the end clamp, as the picture 13 shows.
2.0 The installation of the mid clamp is the same as that of the end clamp. First, screw the sliding nut on the mid clamp to the bottom of the bolt, and then put it sideways into the groove of the rail, as the picture 14 shows.
After install the mid clamp, as the picture 15 shows.
2.1 According to the above steps, use the mid clamp to install the panels, as the picture 16 shows.
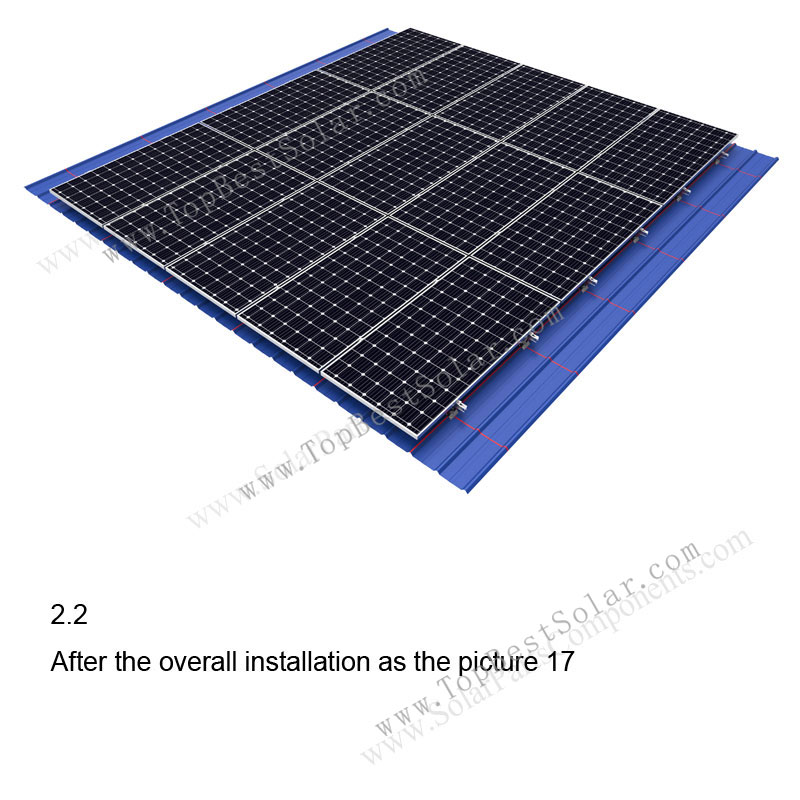
2.2 After the overall installation as the picture 17-18.
- Installation
-
Solar Metal Roof Racking System SPC-RF-CK02-HR
Stainless steel multifunctional roof clamp installation steps
1.1 Clean the tin roof, and according to the site construction drawings,
Draw a line at the installation position of the tin roof multifunctional clamp as picture 1 shows.1.2 Put the multifunctional clamp on the installation position of the tin roof, the rubber washer is attached to the side of the tin roof wave crest, as picture 2 shows. And fix the multifunctional clamp with four self-tapping screw (ST6.3 * 25), as picture 3 shows.
After installation ,as picture 4 shows.
1.3 According to step 2, fix all the remaining multifunctional clamps on the tin roof according to the drawings. After installation, as picture 5 shows.
1.4 Use M8*25 clamp and bolts to install the H-rail on the multifunctional clamps. As picture 6 shows.
1.5 Effect after installation.
As picture 7 shows.1.6 Use the rail splice for the connection between the rail and the rail, Insert the connector into the groove behind the rail, insert 75mm on each side, and then lock the bolts, as picture 8 shows.
After installation ,as picture 9 shows.
1.7 According to the above steps, connect the rails with rail splice first, and then install the rails on the multifunctional clamps according to the construction drawings. After all the rails are installed, as picture 10 shows.
1.8 Put the panel vertically on the two rails, press the solar panel by hand at first to prevent the panel from sliding down, as picture 11 shows.
1.9 Use the end clamp to lock the side of panel, screw the clamp block on the mid clamp to the bottom of the bolt, and then put it sideways into the groove of the rail, as shown in Figure 11.as picture 12 shows.
After install the end clamp, as the picture 13 shows.
2.0 The installation of the mid clamp is the same as that of the end clamp. First, screw the sliding nut on the mid clamp to the bottom of the bolt, and then put it sideways into the groove of the rail, as the picture 14 shows.
After install the mid clamp, as the picture 15 shows.
2.1 According to the above steps, use the mid clamp to install the panels, as the picture 16 shows.
2.2 After the overall installation as the picture 17-18.
Solar Metal Roof Racking with adjustable brackets
Q:
Hi , I am intersted in your Solar Metal Roof Racking with adjustable brackets, I have 1200 panels in total need be installed,each array is 3 x 4 , total 100 array.

Solar Metal Roof Racking with adjustable brackets
A:
Nice to get your inquiry for our metal roof racking system.
Please refer to our design for your metal roof racking system.

Solar Metal Roof Racking with adjustable brackets factory
Q:
It looks nice, please send us your best offer with shipping cost to Traversa 62, 84016 Pagani (SA).
A:
I have sent the BOM price with freight cost to your email.
Thank you!
Solar Metal Roof Racking Manufacturer