


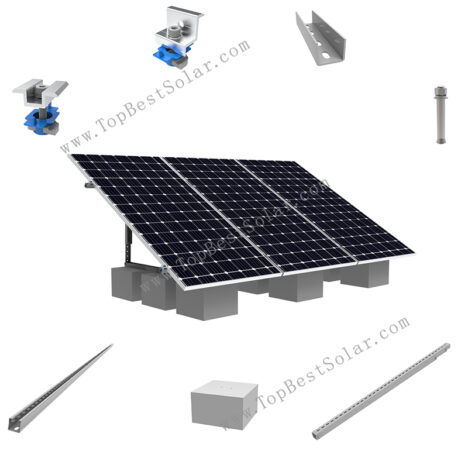
Adjustable Solar Panel Mount
Installation Site: Ground, Flat Roof
Material: S350-ZM,Q235, AL6005-T5, SUS304
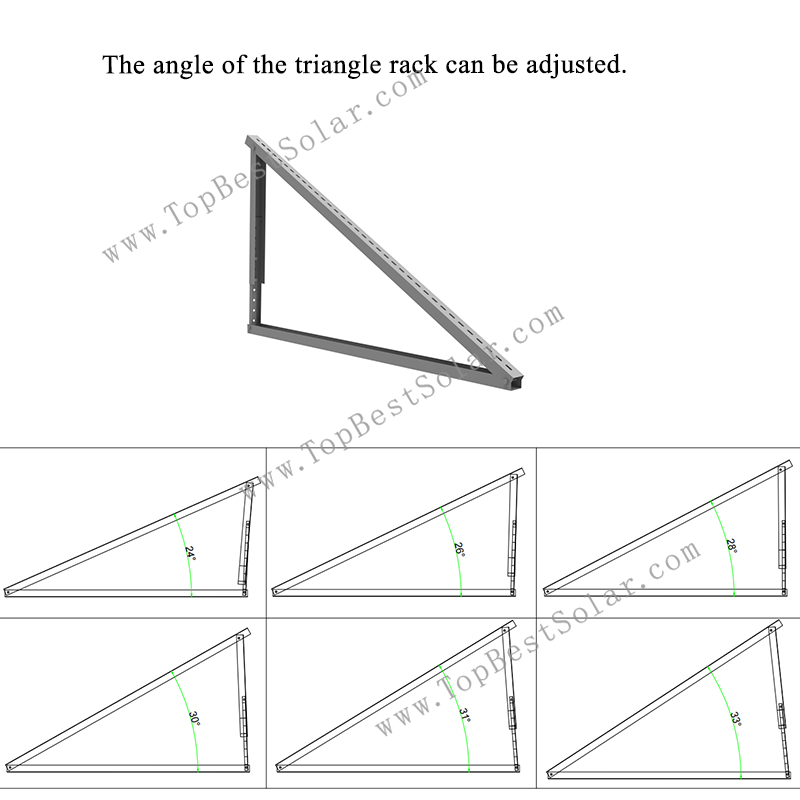
Tilt Angle: 24° to 33°
PV Module: Framed, Frameless
PV Orientation: Portrait, Landscape
Wind Load: 40 m/s
Snow Load: 1.4 KN/M2
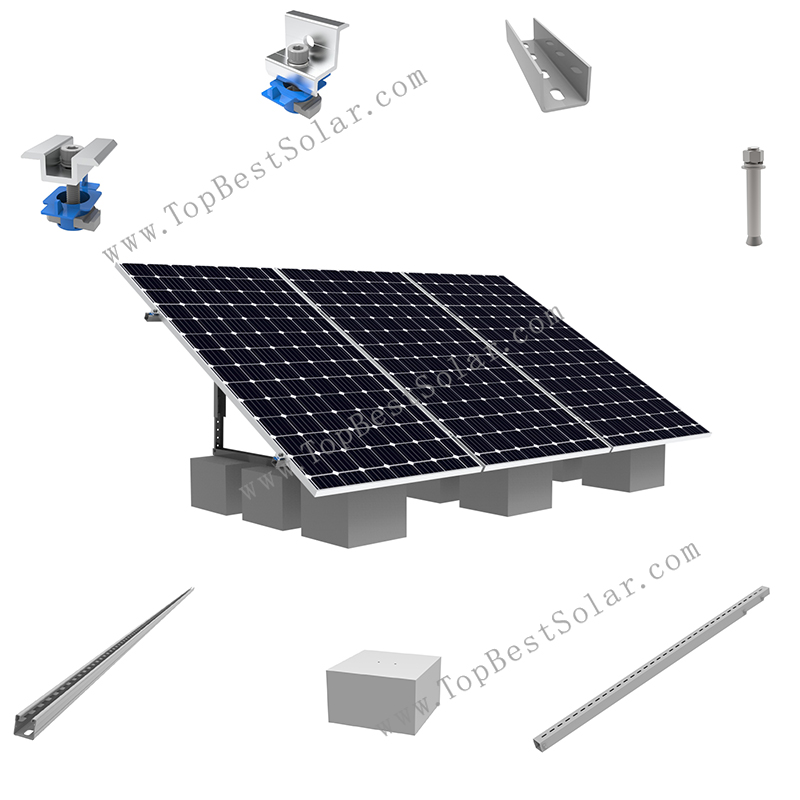
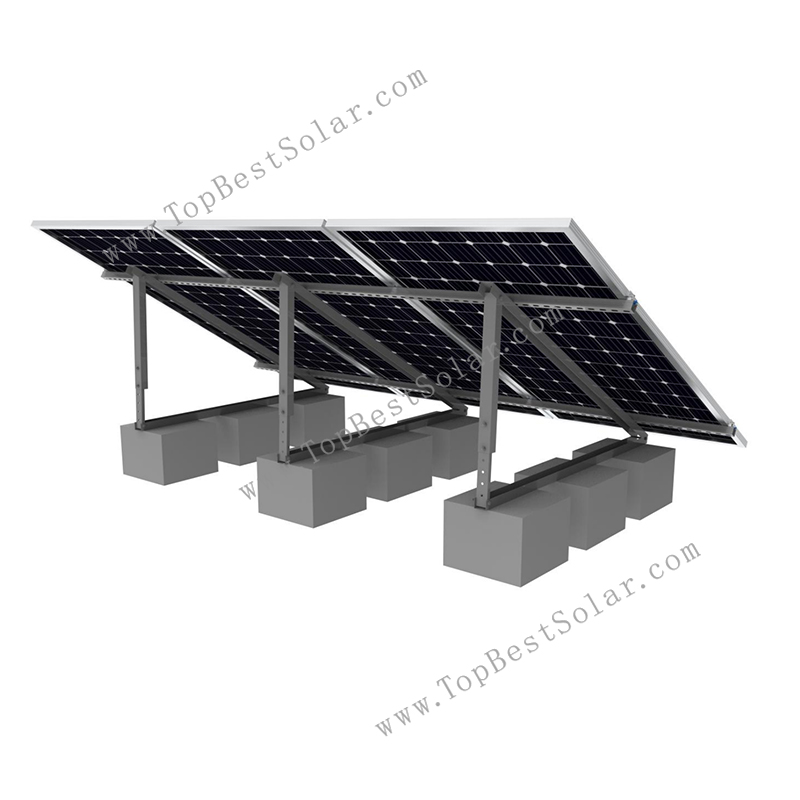
Product Description:
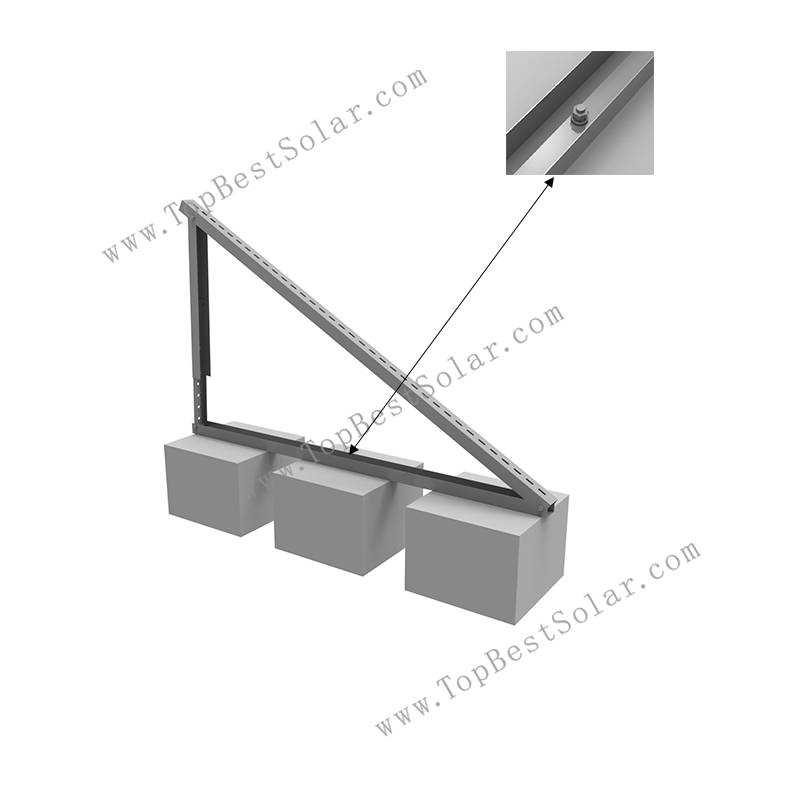
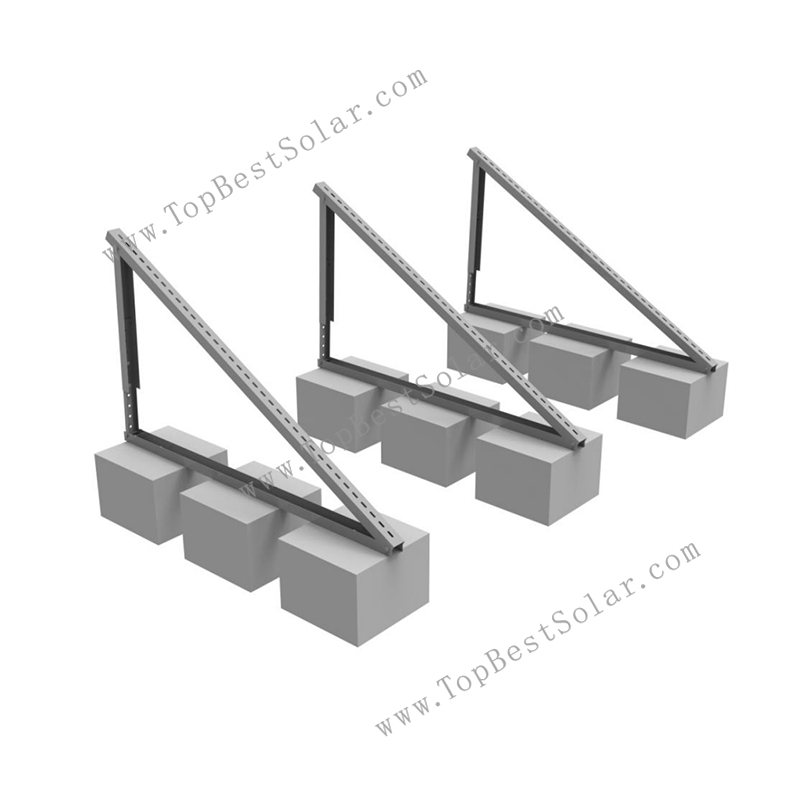
Adjustable Solar Panel Mount suits flat roofs and ground installation. This common rack sets proper tilt angles to boost power generation.The angle can be adjusted from 24-33°. Featuring innovative U steel rails, special modules and triangle kits, this product comes with high pre-assembly design. No on-site cutting or welding is required, allowing fast and simple solar panel installation. It works well when original surfaces cannot offer ideal angles for solar panels.
Features of triangle solar panel mounting:
1)Suitable for residential and commercial flat roofs.
2)Easy expansion for higher power demand.
3)Flexible installation on sloped and flat roof surfaces.
4)Fits most framed and frameless solar panels available on the market.
Components of triangle solar panel mounting:
1. Adjustable triangle rack
2. Mid clamp
3. End clamp
4. Concrete block
5. U rail
6. Rail connector
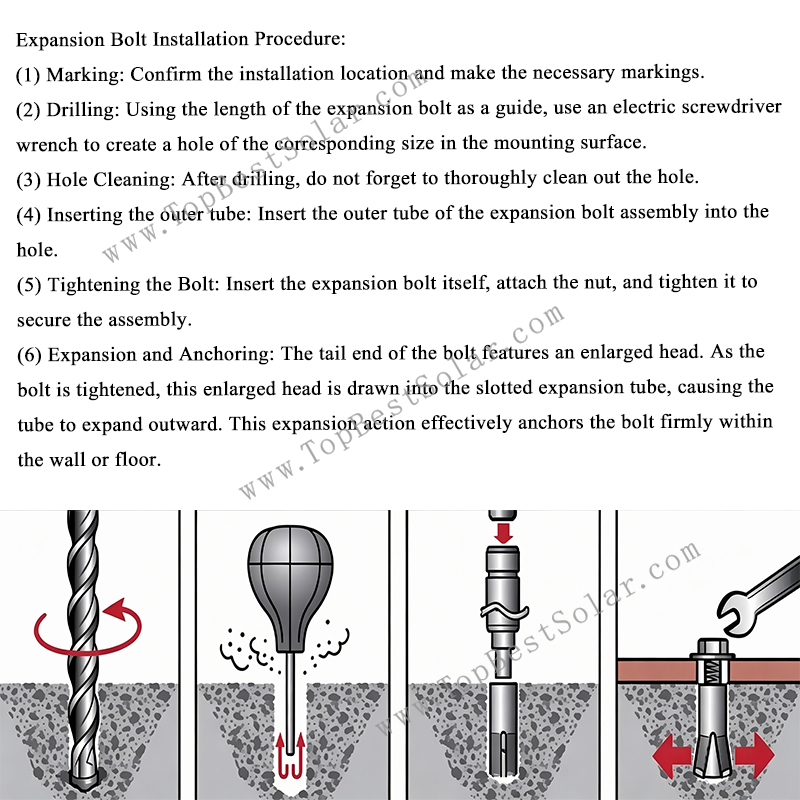
7. Expansion Bolt
This durable triangle solar panel mounting delivers stable, adjustable and easy-install support, ideal for diverse rooftop and ground solar projects.
Welcome to get inquiry about this Adjustable Solar Panel Mount>>
Email: info@topbestsolar.com
WhatsApp/mobile: +86 18359260008
Marker Pen
Adjustable Wrench
Allen Key Wrench
Electric Screwdriver Wrench
Tape Measure
Pile Driver
Nylon Line
T Wrench
Here are the installation steps:
1. Pre-assembled mid clamp and end clamp.
2. Drill holes in the concrete foundation and drive in the expansion bolts.
3. Unfold the triangle rack.(The angle of the triangle rack can be adjusted between 24 and 33 degrees).
4. Fix the triangle rack on the concrete block.
5. Fix the rail on the triangle rack using the M8 bolt assembly.
6. Attach the rail with the mid and end clamps.
7. Lock the bolt of mid and end clamp to secure the solar panel.
8. When the rails need to be joined, they should be fixed by using rail connectors.
9. The installation is completed.
Adjustable Triangle Mounting System Installation Video

What materials are used for Adjustable Solar Panel Mount?
Main material is S350-ZM,the features outstanding corrosion resistance 5-10 times higher than hot-dip galvanized steel. It provides self-healing protection for cut edges and scratches without manual repair. Pre-coated from steel mill, no secondary galvanizing needed. High mechanical strength, smooth surface, long service life for outdoor solar mounting projects. Weld positions require additional anti-corrosion treatment.
Why is the tilt angle of Adjustable Solar Panel Mount set at 24°-33°?
The 24°-33° tilt range optimizes solar irradiance absorption for most flat roof & ground PV projects. Meanwhile, it keeps good structural stability under defined wind & snow loads, avoids excessive counterweight cost caused by overly steep angles, and covers most real world project requirements.
What should I pay attention to when placing concrete blocks for this solar mount?
Place concrete blocks on flat, load-bearing roof areas. Avoid placing directly on roof waterproof seams or thin non-load-bearing areas. Ensure even distribution of ballast weight to prevent local overloading on roof structure.
Can I change tilt angle after installation?
Q:Can I change tilt angle after installation?
A:Yes, tilt can be re‑adjusted between 24‑33° after installation. You need to loosen triangle‑rack locking bolts, reset angle and retighten all bolts.
Q:Is this mounting system penetrating the roof surface?
A:Standard version uses concrete block ballast, non‑penetrating for flat roof; expansion bolts only apply for ground concrete foundation.
Q:What torque value should I apply for mid‑clamp and end‑clamp bolts?
A:Recommended torque for M8 bolt assembly: 14‑18 Nm. Do not over‑torque to avoid panel‑frame damage.
Q:What size / thickness of solar panels are compatible?
A:Works for framed panel frame thickness 30‑45 mm; also compatible with frameless PV modules with proper clamping accessories.
Q:Can I mix portrait and landscape panels within one array?
A:Possible but needs customized layout calculation, please send panel spec sheet for engineering review.
Q:What is the expected service life of this adjustable triangle solar mount?
A:S350‑ZM main structure ≥25 years; SUS304 fasteners ≥25 years; welded points require periodic anti‑corrosion inspection.
- Description
-
Product Description:
Adjustable Solar Panel Mount suits flat roofs and ground installation. This common rack sets proper tilt angles to boost power generation.The angle can be adjusted from 24-33°. Featuring innovative U steel rails, special modules and triangle kits, this product comes with high pre-assembly design. No on-site cutting or welding is required, allowing fast and simple solar panel installation. It works well when original surfaces cannot offer ideal angles for solar panels.
Features of triangle solar panel mounting:
1)Suitable for residential and commercial flat roofs.
2)Easy expansion for higher power demand.
3)Flexible installation on sloped and flat roof surfaces.
4)Fits most framed and frameless solar panels available on the market.Components of triangle solar panel mounting:
1. Adjustable triangle rack
2. Mid clamp
3. End clamp
4. Concrete block
5. U rail
6. Rail connector
7. Expansion BoltThis durable triangle solar panel mounting delivers stable, adjustable and easy-install support, ideal for diverse rooftop and ground solar projects.
Welcome to get inquiry about this Adjustable Solar Panel Mount>>
Email: info@topbestsolar.com
WhatsApp/mobile: +86 18359260008 - Installation Instruction
-
Proper installation of Adjustable Solar Panel Mount requires the following professional tools to guarantee structural safety and installation accuracy:
Marker Pen
Adjustable Wrench
Allen Key Wrench
Electric Screwdriver Wrench
Tape Measure
Pile Driver
Nylon Line
T Wrench
Here are the installation steps:
1. Pre-assembled mid clamp and end clamp.
2. Drill holes in the concrete foundation and drive in the expansion bolts.
3. Unfold the triangle rack.(The angle of the triangle rack can be adjusted between 24 and 33 degrees).
4. Fix the triangle rack on the concrete block.
5. Fix the rail on the triangle rack using the M8 bolt assembly.
6. Attach the rail with the mid and end clamps.
7. Lock the bolt of mid and end clamp to secure the solar panel.
8. When the rails need to be joined, they should be fixed by using rail connectors.
9. The installation is completed.Adjustable Triangle Mounting System Installation Video
- FAQ
-
What materials are used for Adjustable Solar Panel Mount?
Main material is S350-ZM,the features outstanding corrosion resistance 5-10 times higher than hot-dip galvanized steel. It provides self-healing protection for cut edges and scratches without manual repair. Pre-coated from steel mill, no secondary galvanizing needed. High mechanical strength, smooth surface, long service life for outdoor solar mounting projects. Weld positions require additional anti-corrosion treatment.
Why is the tilt angle of Adjustable Solar Panel Mount set at 24°-33°?
The 24°-33° tilt range optimizes solar irradiance absorption for most flat roof & ground PV projects. Meanwhile, it keeps good structural stability under defined wind & snow loads, avoids excessive counterweight cost caused by overly steep angles, and covers most real world project requirements.
What should I pay attention to when placing concrete blocks for this solar mount?
Place concrete blocks on flat, load-bearing roof areas. Avoid placing directly on roof waterproof seams or thin non-load-bearing areas. Ensure even distribution of ballast weight to prevent local overloading on roof structure.
Can I change tilt angle after installation?
Q:Can I change tilt angle after installation?
A:Yes, tilt can be re‑adjusted between 24‑33° after installation. You need to loosen triangle‑rack locking bolts, reset angle and retighten all bolts.
Q:Is this mounting system penetrating the roof surface?
A:Standard version uses concrete block ballast, non‑penetrating for flat roof; expansion bolts only apply for ground concrete foundation.
Q:What torque value should I apply for mid‑clamp and end‑clamp bolts?
A:Recommended torque for M8 bolt assembly: 14‑18 Nm. Do not over‑torque to avoid panel‑frame damage.
Q:What size / thickness of solar panels are compatible?
A:Works for framed panel frame thickness 30‑45 mm; also compatible with frameless PV modules with proper clamping accessories.
Q:Can I mix portrait and landscape panels within one array?
A:Possible but needs customized layout calculation, please send panel spec sheet for engineering review.
Q:What is the expected service life of this adjustable triangle solar mount?
A:S350‑ZM main structure ≥25 years; SUS304 fasteners ≥25 years; welded points require periodic anti‑corrosion inspection.
- Leave Message
-